How to Remove Air Restrictor from Nerf Guns? [Step by Step]
Some players may find that their Nerf guns don’t deliver the performance they desire. One common modification that can significantly enhance the power and range of Nerf guns is to remove air restrictor from nerf gun.
What is an Air Restrictor?
It is a mechanical component built into Nerf guns to control the amount of air released when firing a dart. The restrictor limits the airflow and restricts the force exerted on the dart, thus reducing the potential for injury or damage during play.
By regulating the amount of air that propels the dart, air restrictors help maintain a safe and enjoyable experience. They are designed to ensure the safety of users by limiting the force with which darts are propelled.
For those looking to maximize their Nerf gun’s performance, removing it can make a noticeable difference.
Step by Step Guide on Air Restrictor Removal
Now that you have all the tools ready, let’s walk through the process of removing the air restrictor from your Nerf gun:
Step 1: Gather the Necessary Tools
| Tool | Purpose |
|---|---|
| Screwdriver (Phillips or flathead) | To remove screws from the blaster. |
| Pliers | To pull out the air restrictor if needed. |
| Knife or utility blade | To cut through plastic if necessary. |
| Safety goggles | To protect your eyes during the process. |
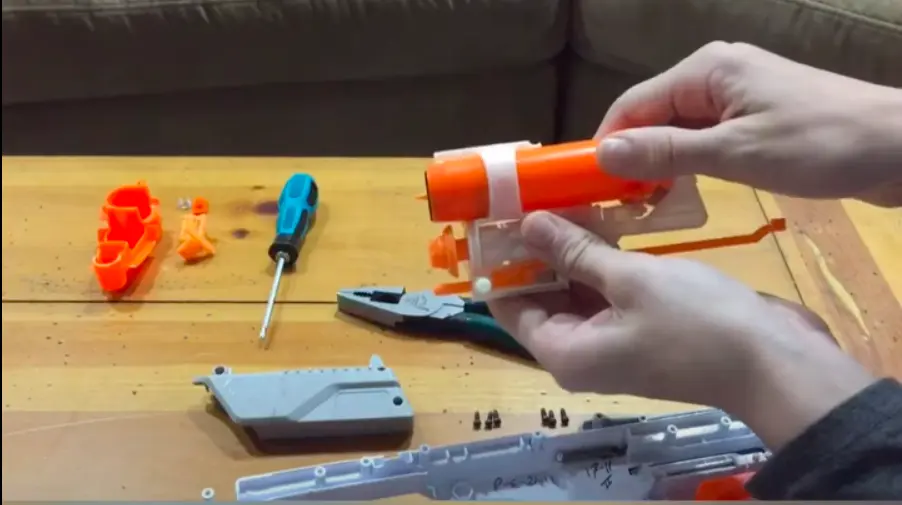
Step 2: Disassemble the Nerf gun
Using the screwdriver, carefully remove all the screws that hold the Nerf gun together. Set aside the screws in a safe place to avoid misplacing them. Gently separate the different parts of the Nerf gun, exposing its internal components.
Step 3: Locate the Air Restrictor
Look for it within the internal mechanism of the Nerf gun. It is typically a small cylindrical or rectangular piece connected to the barrel or plunger system. Take a moment to identify and understand how it is positioned before proceeding.
Step 4: Remove
Using the pliers or needle nose pliers, grip the restrictor firmly and carefully pull it out. Apply steady pressure to detach it from its housing. Be cautious not to damage any surrounding components while doing this.
Step 5: Smooth the Edges (optional)
After removing, you may notice rough edges. To ensure smooth dart flow, use sandpaper to gently sand down any irregularities. This step is optional but recommended for optimal performance.
Step 6: Reassemble the Nerf gun
Now it has been successfully removed, carefully reassemble all the parts of the Nerf gun. Align the pieces correctly and use the screws to secure them back in place. Ensure all the components fit snugly together.
Performance Improvement
Removing the air restrictor can significantly enhance your Nerf gun’s performance. Players often report an increase in range and accuracy after this modification.
Tips for Best Results
- Use quality darts: High-quality darts can further improve performance.
- Keep your blaster clean: Regular maintenance will help ensure optimal performance.
- Experiment: Try different types of darts to see which ones work best with your modified blaster.
Testing the Modified Nerf Gun
Once you have reassembled your Nerf blaster, it’s time to put it to the test. Take your modified blaster to an open space or shooting range and evaluate its performance. Here are a few aspects to consider:
Dart velocity and range
Fire a few darts and observe if there is a noticeable increase in dart velocity and range compared to the gun’s performance before the modification. Pay attention to how far the darts travel and how consistent their flight is.
Accuracy and performance improvements
Test the modified Nerf gun’s accuracy by aiming at targets placed at different distances. Evaluate if the removal has enhanced the gun’s precision and overall performance.
Benefits
The Removal should lead to several performance enhancements, making battles more thrilling and intense. Here are a few key reasons why pro players choose to remove:
Improved Performance
You can unlock the full potential of your Nerf gun. The increased airflow allows more power, which results in high speed darts shooting.
Increased Range and Accuracy
One of the main advantages is the significant improvement in range and accuracy. With the restrictor removed, the dart can travel farther and maintain a more consistent trajectory.
This means you’ll have a better chance of hitting your targets, whether you’re engaged in a backyard battle or participating in competitive Nerf events.
Better Dart Velocity
As its name suggests, it restricts and control the airflow, resulting in reduced dart velocity. By removing it, you can unleash the full power of your Nerf gun, leading to faster dart speeds. T
his increased velocity not only makes your shots more impactful but also adds an extra thrill to your Nerf battles.
Tools and Materials Needed
- Screwdriver: Used to disassemble the Nerf gun.
- Pliers: Handy for gripping and maneuvering small parts.
- Needle nose pliers: Useful for delicate and precise tasks.
- Sandpaper: Optional but recommended for smoothing any rough edges
Conclusion
Removing the air restrictor from your Nerf gun can significantly enhance its performance, providing increased range, accuracy, and dart velocity. By following the above guide, and taking the necessary safety precautions, you can successfully modify your Nerf blaster.
Remember to always prioritize safety and enjoy the improved gameplay experience with your modified Nerf gun.
FAQs

I am a Nerf gun fan, researcher and modder. I post reviews about Nerf blasters and also share tips to solve issues with your toy guns.


![How to Stop Orbeez from Smelling? [Cleaning Gel Balls]](https://smartnerf.com/wp-content/uploads/2022/12/Stop-Orbeez-from-Smelling-768x402.webp)
2 Comments