How to Mod Retaliator Nerf Gun? [Step by Step Instructions]
While the Nerf N-Strike Elite Retaliator is an excellent blaster on its own, modding it can unlock its true potential, enhancing both performance and aesthetics.
One of the favourite blasters in the Nerf community is the Retaliator Nerf gun. The modifications can be done easily with our step by step instructions and tips to help you customize and improve your blaster.
Understanding the Retaliator Nerf Blaster
History and Popularity
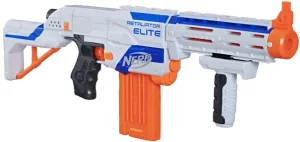
The Retaliator Nerf gun was introduced by Hasbro in 2012 as part of the N-Strike Elite series. It quickly gained popularity due to its sleek design, versatility, and compatibility with various Nerf attachments and accessories.
Since its release, it has become a favorite among modders who enjoy tinkering with blasters to improve and optimize their performance.
Features and Components
The Nerf N-Strike Elite Retaliator Nerf gun is a pump action, spring-powered blaster that features a removable barrel extension, an adjustable stock, and a dart clip system.
It comes with several components, including the main blaster body, a priming slide, a plunger tube, a catch mechanism, a dart clip, a barrel extension, and various screws. Understanding these components is essential before attempting any modifications.
Modding the Nerf N-Strike Elite Retaliator Dart Blaster
Reasons for Modding
Modding this nerf gun can provide several benefits, including increased range, improved accuracy, and better dart velocity. It allows you to customize your blaster to match your playstyle, making it more competitive and enjoyable in Nerf battles.
Additionally, modding can be a creative and rewarding hobby, offering opportunities to showcase your craftsmanship.
Tools and Materials Required
To mod your Retaliator Nerf blaster, you’ll need a set of basic tools and materials. These may include screwdrivers, pliers, an Allen wrench set, sandpaper, epoxy putty, lubricant, a hot glue gun, a heat source (such as a hairdryer), and various replacement springs and O-rings.
Having these items readily available will make the modding process smoother and more efficient.
Step-by-Step Modding Guide
- Disassembly: You can disassemble nerf gun by removing all the screws holding the blaster together. Carefully separate the main blaster body, plunger tube, catch mechanism, and priming slide. Keep track of the screws and components to ensure easy reassembly later.
- Spring Upgrade: Upgrading the spring is one of the most common and effective modifications for improving dart velocity. Replace the stock spring with a stronger one to increase the power of the blaster. Ensure that the new spring is compatible and fits securely.
- Barrel and Breech Modifications: Enhance accuracy and dart compatibility by modifying the barrel and breech. You can remove the air restrictor to improve airflow, resulting in increased range and dart speed. Additionally, consider smoothing the inner barrel and adding a brass barrel for better dart fit and performance.
- Air Restrictor Removal: Removing the air restrictor is a popular modification that allows for increased airflow and dart velocity. Carefully disassemble the blaster to access the air restrictor, and gently remove it using pliers or a small screwdriver.
- Plunger Tube and Catch Upgrades: Upgrading the plunger tube and catch mechanism can significantly improve the blaster’s performance. Replace the stock catch spring with a stronger one to ensure proper dart loading and firing. Additionally, consider upgrading the plunger tube for enhanced air compression and power.
- Other Performance Enhancements: Explore additional modifications based on your preferences and performance goals. These can include seal improvements, O-ring replacements, or even advanced modifications like brass breeches or pump-action conversions. Always research and follow reliable modding guides for such modifications.
Cosmetic Modifications
Modding the Retaliator Nerf gun is not limited to performance enhancements alone. You can also customize its appearance to make it stand out on the battlefield.
- Painting and Color Schemes: Give your blaster a unique look by painting it with colors of your choice. Clean and sand the surfaces before applying primer and paint in thin layers. Add details or stencils to create a personalized design.
- Adding Accessories: Customize your Retaliator by attaching nerf accessories such as scopes, foregrips, or barrel extensions. These accessories not only enhance the blaster’s appearance but can also improve handling and functionality during battles.
Safety Considerations
Before diving into modding, it’s crucial to prioritize nerf gun safety. Modifying a Nerf gun can involve disassembling and reassembling delicate components, working with small parts, and using tools. Always wear safety goggles and work in a well-ventilated area.
It’s also essential to follow the manufacturer’s guidelines and understand that modding may void any warranty.
Tips and Tricks for Modding
- Troubleshooting Common Issues: If you encounter any issues during the modding process, such as jams or misfires, refer to online forums and guides for troubleshooting tips. Common solutions include adjusting dart alignment, improving dart fit, or lubricating moving parts.
- Best Practices and Recommendations: Take your time and follow modding instructions carefully. Ensure that all parts fit together snugly and securely. Test the blaster after each modification to check for any issues before proceeding to the next step.
FAQs

I am a Nerf gun fan, researcher and modder. I post reviews about Nerf blasters and also share tips to solve issues with your toy guns.

One Comment